Over the last few months since my last post, I’ve been working on new software for coordinated robot test beds (details of that effort can be found on this project page). One of the test beds uses underwater vehicles tethered to a power supply and a computer to do feedback control.
As part of the project, I am replaced the existing custom electronics in the robots with open source alternatives. The current electronics and communication protocol are sparsely documented. With the new software system, I wanted to have the option of changing the software on the microcontroller on board the robot. The difficulty of determining how the old board worked gave me an excuse to replace the electronics.
The on board circuitry must control two 24V DC brushed motors in both directions, one 180° hobby servo, read the value from a pressure sensor, and communicate with the computer. I chose the arduino platform for a microcontroller because of its ubiquity, simplicity, and availability of accessories. Specifically, I chose the ruggeduino variant because of its over-voltage and over-current protections and things can occasionally get shorted in a wet environment. It also can source more through its 5V regulator which will be used to power the servo and pressure sensor. I chose Rugged Circuits’ Rugged Motor Shield to drive the DC motors. It comes assembled which saves me a little time when I need six of them, can handle the 24V supply, and uses DRV8801 H-bridge chips which can deliver much more current than LM293 or LM298 H-bridges typically found on motor shields.
The tethers to the robots are up to 50 feet long. Over this distance, USB communication (the typical method for Arduinos) does not work without a power boost. The two common options would be ethernet or RS232 serial. The existing tether only has six lines, only 3 of which can be used for communication, made RS232 the logical choice.
By why does RS232 communication work over long distances when USB does not? USB communicates with a voltage differential of ~3.3V between high and low while RS232 uses a differential of at least 6V and up to 50V between high and low. When a voltage is transmitted over a wire the voltage drops due to the resistance of the wire. The longer the wire the higher the drop. The larger differential in the serial communication essentially makes it easier to distinguish between high and low even if there is a voltage drop.
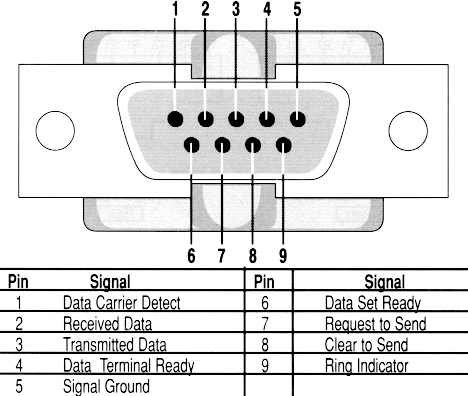
The pinout for RS232 communication using a DB9 port is shown in the figure. The Arduino pin 0 (Rx) should read data from pin 2 of the serial port. Arduino pin 1 (Tx) should receive from pin 3 of the serial port. The reset pin on the Arduino should read from the Data Terminal Ready. This connection is used to signal software loading over the Tx/Rx pins. Finally grounds should be connected.
These pins cannot be directly connected because the large voltage differential of the RS232 communication brings about a issue when communicating with an Arduino. A logical 0 or low is 0V and a 1 or high is +5V for the Arduino. The RS232 sends -3V to -25V as low and +3V to +25V for high. Thus a level shifting chip is necessary. I chose to make a circuit with the MAX232 chip because there were some in the lab. I found a circuit design online specifically for this purpose which saved me a bit of time.

Missing from this diagram is a bypass capacitor (1 or 0.1 μF) from Pin 16 of the MAX to ground. The LEDs are optional and flash during communication. Resistors R1 and R2 are also optional but they offer a little protection if you wire the circuit in correctly. I believe C1 and C3 are used as part of current pumps to reach the higher voltage levels of the RS232 port. Pins 2 and 6 of the MAX232 are output supply voltages.
There are Arduino shields that have this circuit with a DB9 connector. The tether to the robots in this application does not terminate in a standard DB9 port so it did not make sense to use one.
I prototyped the circuit using perfboard:

I hooked it up to the robot and loaded a some code to make it a Robot Operating System node using the rosserial library. The circuit worked and I could control the robot using a joystick. The robot now has open source electronics that have vast documentation around the web. This will be useful if a future student tackle the challenge of making a robot wireless. New software can be loaded to the robot through the tether instead of having to open the pressure chamber as the old board required.
I am currently designing a custom shield to replace that mess of wires and will be sending off the files to have boards made soon.


